

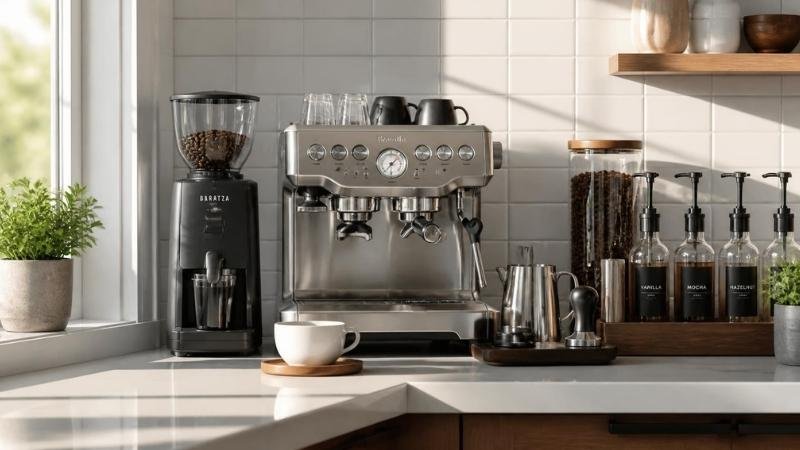
Are you a coffee lover like me who dreams of setting up your own espresso bar at home? If so, I am here to help you make that happen—and save your kitchen from becoming a messy disaster! Most people think that building a home espresso bar is just about buying an expensive machine. But the truth is, it is about creating a complete, smart setup where everything works together perfectly, like a happy little coffee family.
Coffee has become the ultimate favorite drink for most people today. In fact, recent 2026 data from the National Coffee Association shows that coffee remains the top choice for Americans, with 71% of people now preferring to brew their espresso at home instead of visiting expensive cafes. It is much easier on the wallet, and you do not even have to change out of your pajamas!
However, after analyzing hundreds of beginner coffee station setups, the most common failure point is clear: people spend their entire budget on a flashy machine and ignore the rest of the workflow. This leaves them with a beautiful appliance but terrible-tasting coffee. An expensive machine alone cannot give you that perfect extraction.
A flawless home espresso bar relies on a few critical factors that people completely overlook: water filtration chemistry, precision grinder mechanics, structural station organization (so your counter doesn’t look like a bomb went off), and milk frothing wand dynamics.
In this comprehensive guide, we will break down the essential Home barista setup steps, simple maintenance secrets, and core equipment choices—including super-automatic systems versus traditional lever machines. Let’s get started and turn your messy kitchen counter into a clean, professional coffee station!
Quick Summary
ToggleStep 1: Space, Layout, and Electrical Planning
If you are ready to set up your home espresso bar, wait just a second before ordering that expensive espresso machine and tons of coffee beans!! There are a few important things we need to talk about first. Your very first step is looking at your kitchen counter space and layout and carefully planning your electrical structure. If you ignore these setup factors, you will quickly end up with a messy workspace, accessories flying everywhere, and tripped circuit breakers that leave you sitting in the dark without any coffee!
Setting up your workspace for home espresso bar: The Barista Triangle
Making espresso at home does not mean you can just drop your machine anywhere you find an empty plug and start brewing. To get great coffee and a clean setup, you need a smart plan. If you ignore the layout, your counter will quickly become a sticky swamp of water, coffee beans, and flavored syrups.
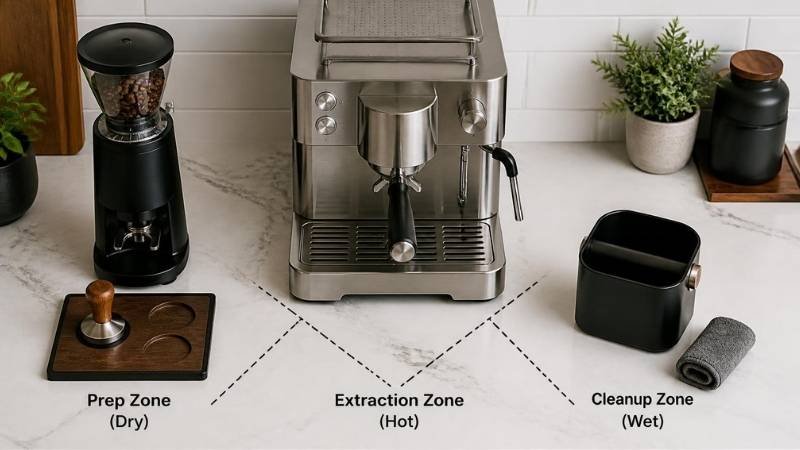
To keep your workflow efficient and mess-free, the most practical home setups adapt commercial café layouts into a three-zone system called ‘The Barista Triangle. In this “Barista Triangle.” Your counter space should be split into these three simple zones:
- The Prep Zone (Dry Zone): This is where you keep your grinder, weighing scale, calibrated tamper, and WDT needle tool. You must keep this area completely dry. If water gets in here, your coffee bean powder and barista tools will be ruined, and nobody wants soggy coffee grounds!
- The Extraction Zone (Hot Zone): This is the hot zone where your espresso machine sits. Make sure this spot has some breathing room (proper ventilation). Your expensive machine needs to stay cool so it does not overheat and take an unwanted vacation.
- The Disposal & Cleaning Zone (Wet Zone): Place your knock box, tamping mat, and cleaning cloths right next to your machine. This makes it super easy to throw away the used coffee pucks without making a total mess on the counter. Plus, a clean kitchen makes your coffee taste even better!
Pro Tip: Always check your Vertical Clearance (the height above your counter). Most people measure how wide their counter is, but they completely forget to look up! Because of this, their fancy new machine or the top bean hopper slams right into the upper kitchen cabinets. Trust me, you do not want to end up cutting your beautiful cabinets apart at your small kitchen coffee bar. You need at least 22 to 24 inches of open space under your cabinets so you can easily pour in your beans and use the cup warmer on top.
The electrical setup: powering your machine safely
Now, let us talk about the engineering side of your home espresso bar. Most people completely ignore this, but it is one of the most important parts of your setup. You might not know this, but espresso machines use very powerful heating elements inside them.
When they are heating up, they pull a massive amount of power—around 1200 to 1800 watts! Because of this, if you plug your machine into a cheap extension cord or share a plug with a heavy appliance like your fridge, your machine will suffer from low voltage.
When your machine does not get stable power, it faces two main problems:
- Crazy Temperatures: Low voltage confuses the machine’s temperature controller. Think of it like when your home AC turns on and the house lights suddenly dim. The same thing happens inside your coffee machine, and the water cannot stay hot. As a result, your espresso shot will taste sour one day and super bitter the next. Nobody wants a guessing game in the morning!
- Strained Water Pumps: Low voltage means the internal pump cannot get enough power to push the lukewarm water. This means your machine cannot hit that steady 9-bar pressure needed for a great espresso, leaving you with a sad, weak cup of coffee.
Pro Tip: Always plug your main espresso machine directly into a Dedicated Wall Outlet (a separate wall switch). Never share a socket with other heavy kitchen appliances, and do not use extension cords. This keeps your machine safe and ensures your coffee brews perfectly every single time.
Weight and heat: Is your counter strong enough?
Another hidden detail you must know is your machine’s weight and heat footprint. A good, professional stainless steel espresso machine can easily weigh between 25kg and 40kg. Once you fill it up with water, it becomes even heavier! Because of this, you need to remember these few things about espresso countertop layout, so your machine works safely:
- If your counter is made of cheap wood, the continuous heat and shaking from the machine can actually make your counter bend over time. To avoid this, always choose a strong and high-quality countertop.
- Also, the steam and moisture from underneath the machine can make cheap wooden sheets swell up like a sponge. To prevent this, always put a heavy-duty silicone barista mat under your espresso machine. It acts like a shield and keeps your counter safe from heat, scratches, and accidental water spills!
Step 2: Choosing Your Core Brewing Hardware for Home Barista Station
Now we are moving into the heart of your home coffee station: your brewing hardware. If you visit any major coffee forum, you will see endless, angry debates about which machine is the absolute king. But let me share an honest secret I learned after tracking hundreds of real beginner setups: the biggest mistake you can make is spending 90% of your budget on a flashy espresso machine and treating your grinder like an afterthought!
The grinder is the actual MVP
Let’s get one thing straight—the grinder matters more than the machine itself. Espresso requires an incredibly fine, perfectly uniform grind size. This fine powder creates a tight, solid “puck” of coffee inside your filter basket. When the machine forces hot water down at high pressure, this puck creates the perfect resistance.
If you use a cheap blade grinder or a low-end burr grinder from a grocery store, it will chop your expensive coffee beans into uneven chunks—some big, some microscopic. When the water hits this unorganized pile, it finds the easiest paths and rushes through too fast. In the coffee world, we call this “channeling.” It leaves you with a watery, sour cup of mud instead of a thick, syrupy espresso with rich hazelnut crema.
| Budget Tier | Total Target | Espresso Machine | Burr Grinder | Essential Tools |
|---|---|---|---|---|
| Entry-Level | $600 – $900 | $350 – $450 | $200 – $300 | $80 – $100 |
| Mid-Tier Enthusiast | $1,200 – $1,800 | $700 – $1,000 | $400 – $600 | $120 – $150 |
| Prosumer Setup | $2,500 – $3,500+ | $1,800 – $2,500 | $700 – $1,000+ | $150 – $200 |
Your grinder is the true engine of your coffee station—it controls particle distribution and creates the puck resistance needed for real crema. If you are debating which piece of gear to upgrade first, check out our guide on buying an espresso machine vs. grinder first for the exact science behind extraction consistency. If you need a great grinder for your espresso bar without breaking the bank. Check out our guide to the Best Budget Single Dose Coffee Grinders Under $300, where I break down the top 5 grinders that actually make great coffee instead of sad, bitter messes!
Understanding the main espresso machine categories
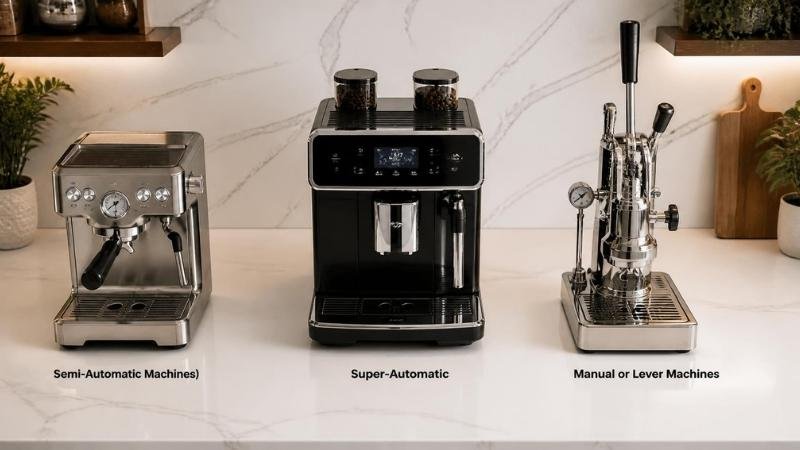
To avoid getting overwhelmed by thousands of online options, you need to understand the three main espresso hardware families:
Semi-automatic machines
This is the classic barista choice for a home espresso bar. The machine handles the heavy engineering—like stable water temperatures and 9-bar pressure—but you are the boss of everything else. You grind the beans, tamp the powder into the basket, lock it in, and decide exactly when to turn the pump off. It has a slight learning curve, but it gives you the ultimate control over your flavor.
Super-automatic machine
These are the ultimate “lazy morning” and best home espresso machines. It is a complete bean-to-cup operation. With a single press of a digital button, the machine grinds the fresh beans inside, drops them into an internal chamber, tamps them, extracts your espresso shot, and even froths your milk automatically! It is perfect for busy schedules, but you do lose the ability to tweak the finer flavor details.
Traditional lever machines
These lever or manual machines are the purist’s dream. There are no electric water pumps here; instead, you use your own muscle power to pull a large mechanical lever down, forcing the water through the coffee bed yourself. It requires deep practice and patience, but pulling a perfect shot on a manual lever machine is an absolute art form.
Lever espresso machines come in two different types, and if you don’t know the difference between them, you can read our guide: “Spring Lever vs Manual Lever Espresso Machines: Which Is Better for Home Baristas?” so you can easily pick the best option for yourself. Also, if you want to buy a high-end or budget-friendly lever espresso machine for your home coffee station, you can visit our article “Best Lever Espresso Machines for Manual Brewing” so you can easily pick a great machine.
Nitro Cold Brew: The Ultimate Chilled Shortcut
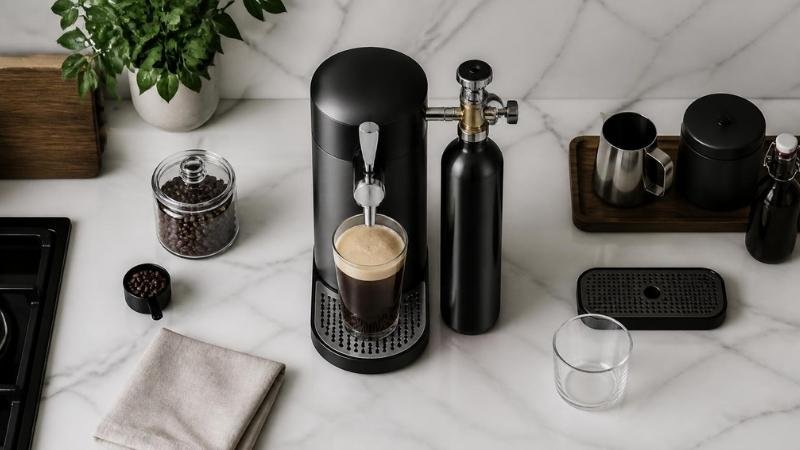
A home espresso bar does not mean you can only drink hot coffee. Today, a huge trend called Nitro Cold Brew is taking over global coffee hubs. Do not confuse this with your standard everyday iced coffee. In this setup, a special tool infuses nitrogen gas into cold brew coffee under high 9-bar pressure.
This drink is incredibly popular right now, and coffee lovers absolutely adore it. To make this at home, you will need a dedicated nitro coffee dispenser or mini-keg. Also, just like you regularly buy coffee beans, you will need to purchase separate nitrogen gas cartridges or packs to power the system.
There is absolutely no harm in trying new things, and you should definitely taste these DIY coffee station ideas! This process relies on nitrogen’s low solubility in liquid, allowing the gas to create a dense, luxurious mouthfeel. For a detailed explanation, read the American Council on Science and Health Study about Nitro Cold Brew Coffee
Step 3: Selecting and Perfecting Your Coffee Beans
You can buy a five-thousand-dollar espresso machine and a competition-grade grinder. But if you feed your setup stale, low-quality coffee beans, your espresso will still taste like absolute disappointment.
Expiration date vs. roast date
When buying coffee for your home espresso bar, ignore the “Best by” or “Expiration Date” printed on the bag. That date is a corporate marketing trap! Freshly roasted coffee beans do not rot like milk, but they do breathe out essential gases. When coffee is freshly roasted, carbon dioxide gas gets trapped inside the organic cell structure of the bean. Over the next few weeks, these gases slowly escape.
If you buy grocery store coffee that has been sitting on a shelf for six months, those gases are completely gone. Without carbon dioxide, the water cannot emulsify the natural coffee oils during extraction. The result? Zero crema. Your shot will look like dark, flat drip coffee and taste incredibly stale and bitter.
The sweet spot for freshness
Always buy from local specialty roasters who print the exact “Roast Date” on the back of the bag. But be careful—bigger is not always better! If you brew coffee that was roasted yesterday, it will contain too much gas. When the hot water hits the powder, it will bubble up violently, creating channels and leading to an uneven, sour extraction.
For balanced espresso extraction and stable crema, the ideal window for whole beans is 7 to 21 days post-roast, allowing excess carbon dioxide to off-gas without losing aromatics. This gives the beans just enough time to degas and settle down, ensuring your shots flow in a smooth, syrupy stream with a thick, beautiful crema layer that holds its shape.
Step 4: Water Quality and Filter Management
Water makes up about 90% of your liquid espresso shot, yet beginners almost entirely ignore it. If you pour straight tap water directly into your brand-new machine’s water reservoir, you are committing two serious crimes: you are ruining the delicate flavor of your coffee, and you are slowly killing your expensive hardware!
The silent killer: scale buildup
Tap water is loaded with heavy minerals, specifically calcium and magnesium. When you pour this water into your machine and cook it inside a high-temperature metal boiler, those minerals separate from the liquid and turn into solid white rock. In engineering, we call this “scale.”
Over time, scale buildup coats the inside of your heating elements like a thick blanket, forcing your brewing machine to work twice as hard to heat up. Even worse, tiny flakes of this mineral rock will break off and clog the microscopic water paths and valves inside your group head. Before you know it, your machine suffers from broken components, low pressure, and a completely dead boiler.
Water chemistry and flavor profiles
Aside from hardware safety, tap water is packed with chlorine and chemical treatments that completely destroy the flavor compounds of specialty coffee as per Specialty Coffee Association of America. Perfect espresso water needs to be a balanced canvas—clean enough to remove harsh chemical tastes, but with just a tiny, precise amount of trace minerals left behind to bind with the coffee oils and pull out the natural sweetness.
Always protect your home espresso bar investment by using a dedicated water filtration pitcher, third-party water softeners, or specialized mineral packets mixed with distilled water. Keeping your water soft ensures your machine runs flawlessly for years and keeps your espresso tasting crisp, bright, and sweet.
Can you use a machine without a water filter?
I strongly advise you to never run an espresso machine without a good water filter. If you skip the filter, your water will create a metallic, terribly sour espresso shot. Even worse, your luxury coffee machine will turn into a useless piece of trash within just one single year! Use a proper filter so you can save your machine and actually enjoy a beautiful, smooth cup of coffee every morning.
Tap water contains hidden minerals that change the flavor of your coffee and damage your machine over time. Before you fill your water tank, read our guide on the hidden risks of using a coffee machine without a water filter. It will save you from bad-tasting coffee and expensive repair bills. To protect your setup immediately, explore our tested recommendations for the best water filters for espresso machines to find the right cartridge or inline system for your budget.
Step 5: Precision Workflow Accessories (The Barista Toolkit)
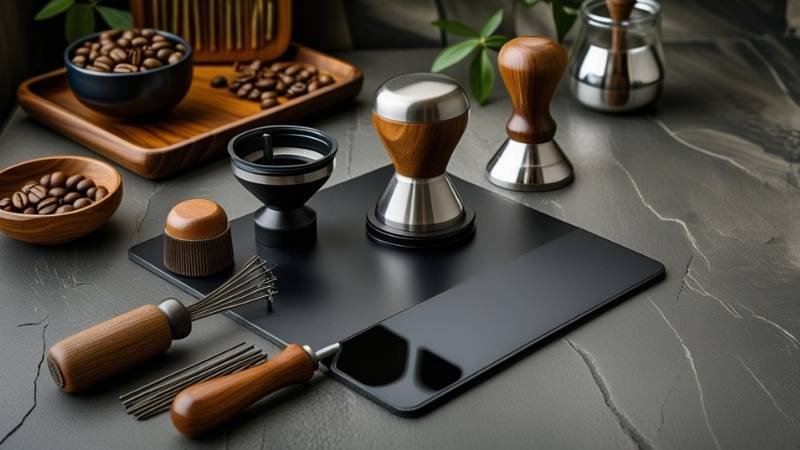
Once you have your core machine and grinder locked down, it’s time to talk about your daily essential coffee bar accessories. This is where you transform from a casual kitchen consumer into a high-precision home barista station setup. Throw away the cheap, flimsy plastic scoop and lightweight tamper that came inside your machine’s cardboard box—they belong in the trash!
Essential coffee bar accessories
To get consistent, professional results every single morning without making your counter look like a bomb went off, you need to assemble a precise toolkit:
0.1g digital gram scale
Espresso is a game of ratios. You cannot eyeball your coffee grounds! You need a thin, waterproof digital gram scale that sits under your cup to measure exactly how many grams of dry powder go into your basket (e.g., 18 grams) versus exactly how many grams of liquid espresso flow out (e.g., 36 grams) within a specific time window.
Calibrated metal tamper
To ensure the hot water extracts the coffee evenly, the powder must be compressed completely flat and level. A heavy, stainless steel and calibrated tamper ensures you press down with uniform force every time, preventing slanted coffee beds that cause major channeling errors.
WDT (weiss distribution technique) tool
This is a simple, affordable tool featuring a handle with fine, flexible needles and is important for your home espresso bar. When you grind coffee into your bottomless portafilter, the powder naturally forms tiny static clumps. Stirring the grounds with a WDT tool breaks up these clumps and reorganizes the powder into a perfectly fluffy, even bed before you tamp.
Heavy barista tamping mat
Never tamp your portafilter directly against your naked kitchen counter! The massive pressure can easily crack cheap wood or scratch expensive stone. A thick, heavy-duty food-grade silicone tamping mat acts as a shield, absorbing the downward force, holding your tools in place, and catching stray coffee dust.
Solid knock box
When your shot is finished, you are left with a hot, muddy, compressed puck of coffee grounds inside your metal basket. You cannot just dig it out with a spoon or slam it against your kitchen trash can (unless you want coffee grounds flying all over your walls). A dedicated knock box features a thick, rubber-coated bar across the top. One quick slap of your bottomless portafilter against the bar drops the clean, solid puck right into the box without a single drop of mess.
Step 6: Mastering Milk Frothing and Cafe Styles
If your ultimate dream is to pour beautiful lattes, velvety cappuccinos, or smooth flat whites for your friends and family, mastering your milk texturing dynamics is just as critical as extracting the espresso shot itself.
The secret of microfoam
Professional café milk isn’t just hot, bubbly milk dumped on top of coffee. True barista milk is called “microfoam.” It should look like glossy, wet white paint, with bubbles so microscopic that the human eye cannot even see them. When you take a sip, it should feel incredibly sweet, thick, and velvety on your tongue. Achieving this texture requires a precise, two-phase dancing technique with your steam wand:
- The Stretching Phase (Injecting Air): You start with ice-cold milk in a stainless steel pitcher. Submerge the tip of your steam wand just slightly below the surface of the milk—literally a millimeter deep—and turn the steam valve fully on. You should hear a clean, gentle “paper tearing” or “chirping” sound every few seconds. This is the wand gently pulling room-fresh air into the cold liquid to build volume.
- The Rolling Phase (Mixing the Foam): Once the milk pitcher starts to feel warm to your hand (around body temperature), drop the steam wand slightly deeper into the liquid and tilt the pitcher to one side. This stops the air injection and creates a high-speed, spinning whirlpool. This whirlpool acts like a blender, tearing any large air bubbles apart and folding the smooth microfoam completely into the liquid. Turn the steam off the exact second the bottom of the pitcher becomes too hot to hold comfortably.
- The Golden Safety Rule: The absolute second you remove the pitcher, you must wipe the hot steam wand immediately with a clean, dedicated wet microfiber cloth. If you wait even twenty seconds, the leftover milk film will bake onto the hot metal nozzle, forming a hard, disgusting crust that breeds bacteria. Once wiped, always “purge” your steam wand by turning it on for one second to blow out any milk that accidentally got sucked up inside the tip!
Step 7: Espresso Glassware and Serving Aesthetics
The specialty espresso experience does not end when your machine’s water pump turns off. How you present, serve, and hold your finished coffee completely dictates your morning mood and sets a luxury hospitality tone for your guests.
Why ceramic mugs kill your espresso
Most beginners make the mistake of pulling a beautiful espresso shot directly into a massive, thick ceramic breakfast mug. Don’t do this! A massive mug has a huge internal surface area that completely sucks the thermal heat straight out of a tiny 2-ounce espresso shot, leaving you with a lukewarm, flat drink within seconds.
The double-walled borosilicate glassware advantage
To truly appreciate your creations, look for high-quality Double-Walled Borosilicate Glassware. These specialized clear glasses feature an inner glass bowl suspended inside an outer glass shell, with a vacuum seal trapped completely in between.
This smart engineering provides a massive visual and thermal advantage:
- The Visual Feast: Because the glass is perfectly transparent, you can clearly watch the beautiful, distinct layers of your extraction—the dark syrupy body, the rich hazelnut-colored crema layer on top, and the beautiful gradient swirls of milk inside a fresh cortado or macchiato.
- Perfect Thermal Balance: The vacuum insulation barrier ensures that the outer wall of the glass stays completely cool to the touch, meaning you will never burn your fingers. Meanwhile, the internal chamber keeps your espresso or latte piping hot for a significantly longer period.
Step 8: Advanced Extraction and Taste Troubleshooting
Even if you follow every single step of this home espresso bar setup guide perfectly, there will inevitably be mornings where you lock in your portafilter, press the brew switch, and end up with a shot of espresso that tastes absolutely terrible. Do not panic! Learning how to diagnose your extraction time faults through taste and flow speed is what separates a true home barista from an amateur.
The three extraction profiles you must watch
When your morning shot tastes off, use this quick troubleshooting guide to diagnose your extraction parameters immediately:
Sour & under-extracted shot
If you turn your machine pump on and the liquid immediately gushes out like an open faucet, finishing a full cup in under 15 seconds, your espresso is heavily under-extracted. When water moves too fast, it only pulls out the sharp surface acids of the bean, leaving you with a shot that tastes sour, salty, and sharp, like lemon juice or battery acid. To scientifically analyze flavor balance, look closely at TDS data using a refractometer, as outlined in the Coffee Factory Espresso Extraction Guide.
The Fix: You must create more resistance for the water. Open your grinder settings and make your grind size finer, or increase your dry coffee dose weight slightly.
Bitter & over-extracted shot
If you turn your machine on and the pump groans loudly, but nothing happens for ten seconds, followed by dark, painful, microscopic drips that take over 40 seconds to finish, your espresso is over-extracted. The water has spent way too much time cooking inside the grounds, dissolving organic wood fibers and bitter plant matter. The result is a dry, harsh shot that tastes burnt, ashy, and hollow.
The Fix: You need to reduce the resistance. Adjust your grinder settings to make your grind size coarser, or slightly reduce your dry coffee dose weight.
Channeling disaster
If you are using a bottomless portafilter and watch your espresso spurt out in wild, high-pressure sprays all over your machine and counter, your coffee puck has cracked. Water always seeks the path of least resistance. If there are air pockets or weak spots inside your coffee bed, the water will blast through those cracks, over-extracting the channels while leaving the rest of the coffee puck completely dry.
The Fix: Improve your prep espresso workflow. Always use a WDT tool to thoroughly break up clumps and distribute the powder perfectly flat and even before applying tamping pressure.
Step 9: Organizing and Maintaining Your Home Coffee Station
A premium home espresso bar is not just a collection of appliances; it is a delicate mechanical system that handles high temperatures, intense water pressure, and organic material. If you ignore your maintenance routines, old coffee oils and organic fats will get trapped inside your machine’s internal pathways, oxidize, and turn completely rancid, causing your fresh morning espresso to taste like bitter, dirty dishwater.
Your simple espresso machine maintenance schedule
To keep your station looking pristine and your hardware running like a brand-new machine for a lifetime, build these simple habits into your routine:
- The Daily Flush: The moment you finish pulling your morning espresso, unlock your portafilter and immediately press the brew switch for two seconds. This quick burst of hot water washes away any sticky, stray coffee grounds stuck to the upper metal shower screen before they dry up and clog the paths. Clean your tamping tools and drop your drip tray to rinse out stray liquid.
- The Weekly Backflush: Once a week, you need to clean the hidden internal valves of your brewing machine at home. Place a solid rubber cleaning disc (a blind basket) inside your portafilter, add a single scoop of specialized espresso cleaning powder, and lock it into your machine. Run the pump for 10 seconds, then turn it off. This builds backward pressure, forcing the detergent solution deep into the internal valves to dissolve baked-on coffee oils. Repeat this with clean water to rinse the path completely clear. (Important Warning: Chemical backflushing with a blind rubber basket is strictly intended for semi-automatic espresso machines equipped with a three-way solenoid valve like the Gaggia Classic Pro or Rancilio Silvia. Never insert a blind backflush disc into a super-automatic bean-to-cup machine or an entry-level thermoblock unit, as trapped pressure can burst internal plumbing lines.)
- The Quarterly Descaling: Depending entirely on how hard your local tap water is, you must run a specialized descaling liquid solution through your water reservoir and internal boilers every 3 to 6 months. This chemical solution breaks down and flushes out any mineral rock formations before they can choke your water lines or crack your internal heating elements.
Super-automatic machines require a dedicated care protocol rather than portafilter backflushing. Follow our step-by-step super-automatic espresso machine maintenance guide to keep internal brew groups and valves clear of rancid oils.
Organizing deep syrup & pump maintenance
We all know how it goes in the morning. You are running late, rushing to make a coffee, and you quickly pump some flavored syrup into your cup. But in that hurry, drops of sweet syrup spill on the counter, and the leftovers dry up right inside the pump nozzle.
So, you should clean your pump in regular basis for smooth operations. Also, do yourself a huge favor and get a proper coffee beans and syrup organizer. It keeps everything looking clean and organized at your home espresso bar, and frees you from sticky disasters.
Regular maintenance, including cleaning the steam wand and descaling, is essential for optimal performance of your espresso bar. But, incorporating design elements enhances the overall aesthetic. For creative visual inspiration, check out the Architectural Digest Coffee Bar Design Gallery.
Frequently Asked Questions (FAQs)
What is the ideal budget split between the machine and grinder for beginners?
The ideal budget rule is to spend 40% to 50% of your total funds on the grinder and the rest on the machine. A $400 espresso machine paired with a $500 stepless burr grinder will consistently pull rich, sweet shots. If you spend $1,500 on a luxury machine but pair it with a cheap $100 grinder, the uneven grounds will cause severe channeling, leaving your coffee sour and watery.
Can I use regular tap water in my home espresso machine?
No, you should never run plain tap water through an espresso machine. Tap water carries dissolved calcium and magnesium minerals that turn into solid limescale, clogging internal copper pipes and ruining the heating element within 6 to 12 months. Use a dedicated water softening pitcher, in-tank filter pouches, or remineralized distilled water to keep your water hardness balanced.
How much does it realistically cost to build a complete home espresso setup?
A dependable entry-level home espresso setup costs between $600 and $900 in total. This budget covers a solid entry-level semi-automatic machine ($350–$450), a dedicated espresso burr grinder ($200–$300), and vital workflow accessories ($80–$120) including a 0.1g digital scale, a needle WDT tool, a metal tamper, and a protective silicone counter mat.
How long should I wait after the roast date to pull espresso shots?
Wait 7 to 14 days after the roast date before pulling shots on your machine. Freshly roasted whole beans trap high amounts of carbon dioxide gas that disrupt water contact and cause sour, fizzy extractions. Dark roasts settle down within 5 to 7 days, while dense light specialty roasts need 12 to 21 days of resting to degas properly for thick, stable crema.
Is a WDT tool and calibrated tamper actually necessary or just hype?
Yes, both tools are necessary to prevent channeling under 9 bars of high water pressure. Water naturally forces its way through the path of least resistance in your portafilter. A needle WDT tool breaks up static clumps to fluff the coffee bed, while a calibrated tamper levels the puck with flat, uniform resistance so water extracts the coffee evenly across the entire basket.
Conclusion: Welcome to the True Home Barista Club
Setting up a perfect home espresso bar is not just about decorating a lonely corner of your kitchen; it is a total lifestyle upgrade. It is about that incredible morning aroma filling up your house, and that pure peace you feel with the very first sip of your favorite brew. Finishing this mega guide means you are no longer just a casual coffee drinker—you are officially on your way to becoming a true home barista!!!
Honestly, if this guide helps you find your rhythm, I will feel like all the weeks I spent writing it were completely worth it. This little home coffee station is your new personal playground. You get to experiment with fresh flavors, fix your terrible latte art, and polish your skills every single day.
Sure, this journey might feel a bit tricky at first. Your first few espresso shots might taste like battery acid, but remember that every professional barista started from absolute zero too. You now have the same core knowledge that global coffee communities and experts rely on every single day. So, do not freeze up or get overwhelmed by choices.
You do not need to buy every single shiny gadget on day one! The real fun of this hobby is buying things slowly, one piece at a time, and watching your DIY coffee bar setup grow over time. I really hope you loved this small kitchen coffee bar setup guide. If it helped you out, please drop a comment below and share it with your coffee-loving friends. Have an amazing journey brewing your perfect morning cup!
Brewing the perfect espresso takes time and practice. If you want to know more about my background and website journey, check out our [About Us] page. Still having trouble getting the perfect crema? Feel free to reach out directly through the [Contact Us] page—I would love to help you tweak your recipe!